Category Archives: Photos

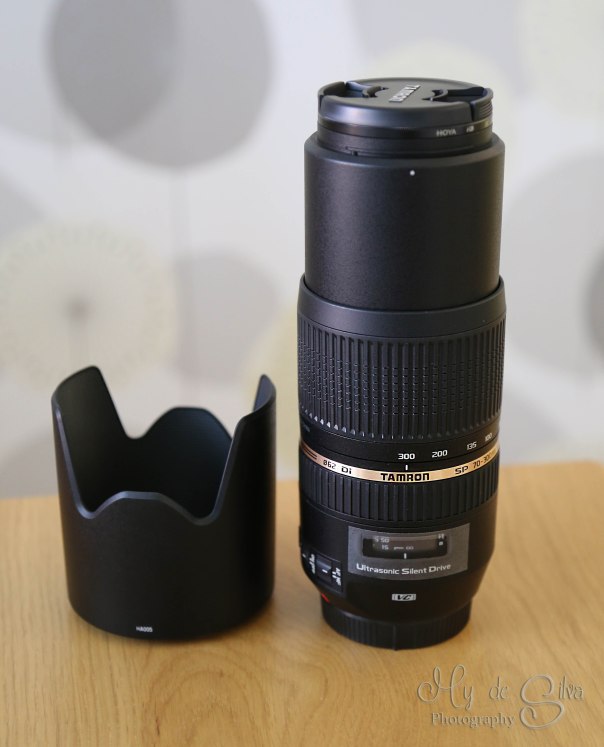
Looking for a budget lens with great sharpness?
Then the Tamron 70-300mm is the answer
I wanted a camera that I could use during a Europe tour. I was not looking for a fancy lens, I just wanted a simple easy to use lens. I found Tamron 70-300mm. This lens is called Tamron AF SP 70-300mm F/4-5.6 DI VC USD, but who can remember to say all of that?


I combined this lens with my full format camera Canon 6D. It was performing great. The auto focus on this lens is outstanding. It is absolutely steady when you want to take the picture when the auto focus is on. That is a big plus for this budget lens. The price is in favor for this Tamron lens, only 3000 SEK (350 US Dollar).
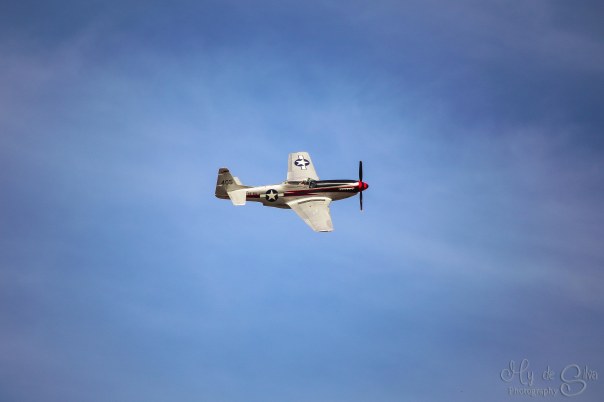
At 300mm
I combined this lens with my full format camera Canon 6D. It was performing great.
These pictures are taken at a folk dance event called europeade in Sweden with the combo Canon 6D and Tamron 70-300mm. The lens give sharp pictures, even when objects are moving.

This picture is taken with the combo Canon 70D and Tamron 70-300mm

I have noticed a little vignetting when I took some pictures at a airshow with the combo Canon 6D and Tamron 70-300mm. This happen when it was very bright sunshine that made everything look dark in the viewfinder. It can be that the sun was very bright and made the picture little darker sometimes and I had to put up the brightness in the camera. Otherwise the lens have really performed great all the time when I have used it. This picture is taken at 300mm. See example below:
The aperture starts at f4. This means the background might not be as blurry as you might wish for, but this can be done in Photoshop or Lightroom in post-production. So it is not a big deal.
The lens might be little heavy but if you are used to a lens like the big zoom lens Tamron 150-600mm. Then Tamron 70-300mm is not heavy at all.
It fits nicely into my small camera bag where I have a Canon 50mm f1.4 lens and Canon 24-105mm lens. Together all the three lenses will cover all your need when its comes to street photography, travels, dance events and even bird photography.
Want to know more about Tamron lenses? Click here for more info about Tamron 150-600mm. Maybe you are more into macro photography? Then Tamron 90mm is the lens for you
2015©Expressive Photos

Eurasian Curlew with Tamron 150-600mm
Do I have something on my beak?

Eurasian Curlew
On a sunny day I took this picture of a Eurasian Curlew. Its a mid sized bird that looks very interesting with the long beak. It is taken at 600 mm with Tamron 150-600mm lens and with Canon 70D. Even if this picture is taken at the maximum length of 600 mm it still turned out sharp. Tamron perform great when it is sunny weather. All the details will be seen and it nicely blurred out the background. The aperture is at f7.1 in this picture.
2015©Expressive Photos

I want food!
Black-headed Gulls

Begging for food
I took this picture when I was near a pond in a park. These birds looked very funny, like they were having a conversation so I quickly took a picture of them. I think the little black-headed gull is saying to the other that it wants food.
I used Tamron 150-600 mm with Canon 6D. The 6D really make the picture look softer and I like the result. Have you ever tried this lens and camera combination? Which combination do you prefer?
To see more pictures of this combo click here or follow me on facebook by clicking here.
2015©Expressive Photos

With a little help of Lightroom
Frustrated with your pictures being colorless?
Picture this scenario. You are seeing something that you want to take a picture of and when you take the picture and see the results in your camera or computer it does not come out quite the way you wanted it to.
Then there is a solution for that. It is called post-production. It is what all professional photographers do to their pictures, to make it look even better. So you do not have to feel ashamed for using a little help from example a program called Lightroom. I want to show you a before and after pictures to demonstrate what I mean. See the examples below, you need to click on the pictures to get a better comparison:

Before and after post production
The picture to the left was taken with the “shade” option, therefore it is more yellowish. In Lightroom you can easily adjust this to make it look more natural. It is more colorful on the picture to the right. The picture below shows a dark picture inside the forest. It is hard to get the right brightness when you take a picture. It is easy to fix in post-production.

Here is a final one that I like to share with you all. When you load a picture in the camera and watch it in the computer it can be colorless. With Lightroom you can bring out the bright colors and give the picture life again. There are many programs that can do this for your pictures for example Photoshop, Gimp (free program) and Topaz just to name a few.

I hope you have got some inspiration to work on your pictures now, it is worth it!
Do not forget to press the “follow” button to get yourself updated on more upcoming tips.
2014©Expressive photos

Autumn is here


I took a stroll in the forest since the color on the leaves are amazing this time of the year. I took some shoots with Canon 70D and Canon 24-105mm L lens.
To follow my blog and get more lovely updates click the “Follow” button.
2014©Expressive photos

Pink explosion of flowers

Taken with Canon 70D and Tamron 90mm macro lens, handheld and in windy conditions.
2014©Expressive Photos

Tamron 150-600mm – Falcon

Taken with Tamron 150-600mm. At 600mm f/10 with Canon 70D.
2014©Expressive Photos

Testing Canon 65mm f2.8 1-5x macro lens
Come closer to your object

Elasmucha grisea
I recently wrote about the Canon 65mm macro lens, but I had not yet taken any pics at that time. Now I have tried it out and I will show you a picture of a bug called Elasmucha grisea. The bug is barely 1 centimeter. When I took this picture I was using 3-4 times magnification. The shot was taken outdoor on a windy day. The picture was also taken handheld. The odds were against me but I managed to capture this bug in the right moment when the wind was not blowing to much.
If I would have used the 5 times magnification on this lens, think about how close I could have got but that is almost impossible to do since it was handheld. It needs to be on a tripod to take a picture with 5 times magnification.
2014©Expressive Photos

Raindrops and crowns
Practicing speed? Then taking pictures of raindrops is a good way to practice to take the picture at the right time. You might have to take 100’s of pictures but you will at least get few good ones. I am practicing for a marathon that will take place tomorrow, I will be the sport photographer. When I went to see the path they are going to run I came across a little dripping waterfall. It is a source for iron water. The wall is orange because of all the iron in the water. It gave a nice background color to the pictures I am about to show you.


When the drops hit the ground waves and crowns will be formed. If you can capture those you can have amazing pictures. I also like to keep the funny looking creations that is made after the drop has hit the ground, I am showing one of those in the picture collage below.


All these pictures are taken handheld with Tamron 90mm f2.8 macro lens and Canon 70D. It is taken without flash, the only light used was the sunlight.
Copyright©2014 Expressive photos

You look very interesting, let me have a look at you.

Monkey takes an interest for the camera lens. Maybe it is trying to see itself in the reflection. Taken with Canon 70D and Tamron 90mm with f9.
Copyright©2014 Expressive photos


