Blog Archives

Gimbal for bird photography – Beike-45
If you like wildlife photography and especially bird photography then eventually you might need a gimbal on your tripod.
The gimbal makes it easy to follow the bird when it flies by you. It is easy to use, it rotates the way I want it to. I can easily follow fast moving objects with this gimbal.
I can recommend Beike-45. Why?
Because it is great! It is also good value for your money. It only cost 70 US dollars nowadays. Normally similar kind of gimbals cost around 300-450 US dollars. I bought mine in 2015 at Aliexpress from China, then it cost me 78 US dollars. I got it delivered in 3 weeks. So if you are planning to go somewhere for wildlife photography order it in time for it to be delivered before you go on a trip.

I used to always have this Gimbal ready on my tripod when I was going somewhere for bird photography and I knew I would be there for a while. It is not that heavy to carry. It weighs around 1 kilo. On the above picture I have a Canon 70D and Tamron 150-600mm attached to the Gimbal. I dont have to worry that it might tip over, it is very stable and it is easy to rotate.

When you use a gimbal make sure that you have the level meter on your camera. Usually it will look like a red/green line that gives you direction on which way to turn to make the camera straight.

2017©Expressive Photos

GorillaPod – a item you might need

If you need a tripod but do not want to carry a huge and heavy one. I have a solution for you. A JOBY GorillaPod. It is a small and flexible tripod that can grip on to anything. You can for example tie it around a tree branch or a chair. I bought one because I like to take things that might be on the ground or near the ground. Then this tripod is the perfect choice. There are many versions of this tripod. The one on the picture is for a DSLR camera with a big lens. Even though it might look small, it is strong and stable to put the camera or the lens on.
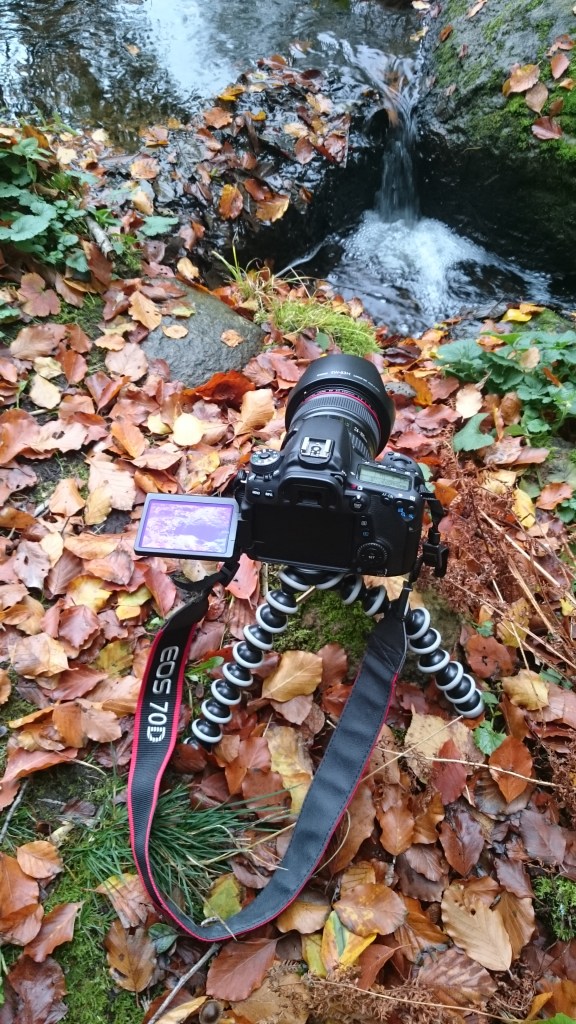
I used it to take long exposures of this small waterfall. It worked fine and the result can be seen below:
This tripod is also good for macro. If you see a insect on the ground or on a leaf then this will be helpful. I usually take those pictures without a tripod but after awhile you will get pain in your knees and in your hand/wrist. This tripod will take care of that problem. The best part is that it can fit in any camera bag. It weighs around 0.5 kg (11 pounds). It is 29 cm long (11.4 inch) and can hold up to 3 kg. It cost from 18$.
2014©Expressive photos

Tripod – Triopo GT3232X8C + ball head NB-3S
I bought my first tripod and after many searches on internet I decided I wanted a Carbon fiber tripod. Carbon fiber tripods are light weight which is good when you are walking a lot and do not want to carry heavy tripods.
I saw a offer on Triopo GT3232X8C where I got the professional ball head Triopo NB-3S for free. It cost me 2299 Swedish kronor ($332 or €249). So I thought that was a pretty good offer. I have not heard of Triopo before but I was willing to give it a chance.
I got it delivered today and here is some pictures of it.


The folded size of the tripod is about 48 cm. The tripod can become 190 cm, that is really high. It is good if you want to be able to take pictures over everyone’s heads. It is really light weight, it only weighs 1.4 kg and can have a max load of 15 kg. I have read in some reviews about this tripod that they have a hard time folding it into the bag. I have tried it without any problem. So it works to have both the ball head and the tripod in the bag if you know how to turn the legs 180 degrees. That its what the first picture shows, it is folded with the ball head.
At the end of the legs you can turn the rubber feet and the spikes will come out. The spikes are good for outdoor photography when you need extra grip on the ground. Make sure to keep the spikes hidden in the rubber feet when you are indoor to not damage the floor. One leg can bee screwed off and use as a monopod.


The camera plate is having a smart function where you do not need a tool to screw it into the camera. There is already a handle that you can turn easily.


There is a smaller bar included for example when you are taking macro shots. It means you can spread out the tripod legs and use the small bar to get as low as 28 cm from the ground. You can always turn the camera upside down and use the bigger bar as well. There are lots of options with this tripod.
There is another function as well and that is the hook. You can use the hook to put some weight on the tripod to make it even more stable when you are in a windy place.


The ball head I got in the offer is called NB-3S. It is Triopo’s very own professional ball head. So I did not have to worry about if it would fit the tripod. It weighs 0.57 kg. This ball head can take 12 kg, so it is good for bigger lenses. I will be able to use my Tamron 150-600mm on it without any problem. It does not have the quick release button that many ball heads have. This one uses a screw to open and remove the camera plate, it makes it slower but it does not matter to me. It goes pretty fast to screw the plate on place too. The ball head is smooth and easy to use.


I have not tried it outdoors yet but I will write about the tripod when I have tried it out more and give a full review.
Do you have any questions? Feel free to comment and I will answer. If you have used Triopo what is your experience from it? Do not forget to like my page on Facebook to keep yourself updated with the latest news. You can also follow this page so that you get the new articles.
Copyright©2014 Expressive Photos
Think Tank – Glass Taxi bag
I was looking for a small bag to fit the Tamron 150-600mm mounted to my Canon 60D. I had seen the review with Jared Polin for this bag. He was able to put in lots of pro lenses in that small bag. He was very surprised by how good the bag was and was saying it was light weight. So I thought I have to try the bag to see what the fuss is all about.
I was checking it out in the store and I also had my camera and the Tamron 150-600 mm lens with me to try it out.
First thoughts of this bag was that the lens and the camera fits in the bag! That is a good start.

When the padding came into the picture, the issue started. The shop keeper and I tried to build it up so that you would be able to fit the camera house mounted on the big Tamron 150-600 lens and still have some lenses on the side of the big lens. That was not easy.

The good thing about Glass Taxi bag is that it has a option where you can choose to only have a big lens in the middle of the bag but then there will be no space for any other lenses. See the picture above to understand what I mean.

As you can see from the picture above you can fit lenses on the side if the big lens is straight. The problem with the Tamron 150-600 mm lens is that it is not straight and that makes it little harder to fit in this bag. The Tamron lens becomes wider in the end of the lens. That puts the camera house in a strange angle in the bag and the padding does not fit then. I am not saying it wont go, but I am saying that the camera bag is not built for the Tamron 150-600m mounted on a camera house.
This is what you can use the bag for:
- Holds up to a 500mm f/4 lens.
- Holds a 300mm f/2.8 with DSLR
- Holds a pro DSLR

Technical Specifications:
- Interior Dimensions: 8.3” W x 16.3” H x 8” D (21.1 x 41.4 x 20.3 cm)
- Exterior Dimensions: 8.5” W x 17” H x 9.5” D (21.6 x 43.2 x 24.1 cm)
- Weight: 2–3.7 lbs (0.9–1.7 kg)


Glass Taxi can be used as a backpack or a shoulder bag. You can attached a monopod or a middle size tripod on the side of the bag. With the speed/skin belt you can attached even more components on the belt, if you want that.
Another thing I noticed with the Think Tank Glass Taxi bag is that the side of the bags are very thin. This means if you happen to drop the bag your lenses and camera equipment can take damage. That is the reason I did not buy the bag. To bad Think Tank, other wise it would have been a nice bag. I am not willing to take a risk with this bag.
It does not matter that the padding in the middle on the inside of the bag is thick because there are no padding on the sides of the bag. This is something Jared Polin forgot to mention when he did his review and praised this bag.
A good advice is to always try out the bag in a store before you buy it. If you order the bag online you will not notice these things until you open the bag and then it might be to big of a hassle to send it back.
The price is right now around 159 US dollars. The pictures are from Think Tank’s site.
©2014
Bag for Tamron 150-600mm
I have found the bag that fits Tamron 150-600 mm with additional lenses and the camera house. The bag is called Lowepro Pro Runner 300 AW.

I wanted the following features when I was searching for a camera bag;
– fit Tamron 150-600 mm lens attached to the camera house
– not to big bag
– fit few more things in the bag than just the Tamron and the camera house
– inbuilt waterproof material
– be able to have a tripod attached to the bag
– well protected
Finally I found the Lowepro Pro Runner 300 AW that fulfilled all the features I wanted.


These are the technical specifications:
Internal Dimensions: 28.5 x 11.5 x 38.5 cm (11.22 x 4.53 x 15.16 in)
External Dimensions: 33 x 19 x 44 cm (12.99 x 7.48 x 17.32 in)
Weight: 1.4 kg (3.08 lbs)


As you can see from the above pictures I can fit the camera house on the Tamron 150-600 lens with the hood. I can also fit 4 other lenses and a flash. If I remove the 2 last walls that is below the Tamron 150-600 mm lens I can fit even longer lenses in this bag. So it is a bag that can be used for many kinds of lenses. When I am outdoors and I want to take the camera house and the attached Tamron 150-600mm I can easily do this with this bag.
The bag comes with a inbuilt raincoat and it has a tripod pouch at the bottom of the bag to put the tripod and then attach it to the bag on the top as well.


I will write more about the alternative bags that can be useful for Tamron 150-600 mm or any other similar size lens in another article. In that case you have more bags to choose from. If you have any questions about this bag just ask.
2014©ExpressivePhotos
Closer look at the Tamron 150-600 mm
Ever wondered what all the Letters stand for that comes after the aperture number? The Tamron 150-600 mm f/5-6.3 DI VC USD has DI “Digital Integrated design”. VC stand for Vibration Compensation. USD stands for “Ultrasonic Silent Drive”. Lets take a closer look at the Tamron 150-600 mm lens. I let the picture do most of the talking:

With the lens you also get the big lens hood and the detached tripod mount. This particular lens version is for Canon.

When the lens is set for the lowest of focal length of 150 mm and with the lens cap front and back the lens is about 27 cm (10.62 inches).


When the focal length is set to 600 mm the lens is about 35 cm with the front and back cap.


The zoom is from 150 mm to 600 mm. Which make it a great ultra lens for outdoor shooting. It has a zoom lock as well.

VC stand for Vibration Compensation and it is Tamron’s image stabilization system.

The lens is 95 mm. It might be hard to come by this lens size but online you can find shops that have filters for this size.

I have bought a filter called B+W UV 95mm MRC, which one shop was selling especially for this Tamron lens. This filter also have a sky-lighter filter which give a pink tone and make it a warmer color tone in the picture.
For a full review on Tamron 150-600 mm press “follow” button to get the review of Tamron 150-600 mm lens.
2014©ExpressivePhotos


