
Is it possible to take photos of insects with a telephoto lens?
Tamron 150-600mm lens delivers quality close-up photos of insects
I was out shooting some pictures of birds with the Tamron 150-600mm and then suddenly I saw a dragonfly on a leaf. I quickly zoomed in on it and took a picture. The result is showed below.

Red dragonfly (Oriental Scarlet Crocothemis servilia), its a male. Male is totally red colored and female is olivaceous brown in color. It lives everywhere near stagnant water reservoirs such as tanks, ponds and paddy fields. This shot is taken with my big lens, but I got it to look like macro photography. It’s taken in India.
Now who says you can’t take a good macro picture with a big lens? I just proved it is possible. Here is one more proof:

Green dragonfly
I also took a picture of a butterfly. I think the result turn out pretty good. I have not done anything to the picture just added my logo.

Grey Pansy Butterfly taken with Tamron 150-600mm
I am not saying that you should replace your macro lenses with a telephoto lens. I am just glad you can take different photo styles with one lens.
Dont forget to follow this page and like the FB page. You can also check out more pictures on my Flickr page, the link is in the right menu.
2015©Expressivephotos

Crested Hawk Eagle – Tamron 150-600mm
Close up of a crested Hawk Eagle from India
The pictures below is Taken with a Canon 70D and Tamron 150-600mm. I took this picture in south of India. The Crested Hawk Eagle blend in with the environment so they can sometimes be hard to see. I was lucky enough to see this kind of bird twice.


2015©ExpressivePhotos

Tufted grey Langur – Tamron 150-600mm

Today’s picture is of a Langur from south of India. The picture is taken from a bus far away from the object. Used Canon 70D with a Tamron 150-600mm lens.
2015©Expressive Photos
Red-whiskered Bulbul and Tamron 150-600mm
Time to fly

The picture is taken in India. The little Red-whiskered Bulbul were about to fly but I managed to take this picture just before it took of. The Tamron 150-600mm lens was used with Canon 70D and it makes a great combination if you ask me. Tamron makes a nice smooth background.
2015©Expressive Photos
Crested Hawk-Eagle – taken with Tamron 150-600mm

I went to India for my holiday. The picture is taken from the car and the bird were barely visible from where we were. The bird is called Crested Hawk-Eagle. I used a Canon 70D and Tamron 150-600mm to capture this picture. The bird has a unique look.
2015©Expressive Photos

First picture of the year

Bear looking right at me
Picture is taken with Canon 70D and Tamron 150-600mm.
I have noticed that people like to steal this picture and use it as for commercial purposes. If you do that you are breaking the Copyright law. I do not allow anyway to use my images for commercial purposes.
2015©Expressive Photos

This work is licensed under a Creative Commons Attribution-NonCommercial-NoDerivatives 4.0 International License.

With a little help of Lightroom
Frustrated with your pictures being colorless?
Picture this scenario. You are seeing something that you want to take a picture of and when you take the picture and see the results in your camera or computer it does not come out quite the way you wanted it to.
Then there is a solution for that. It is called post-production. It is what all professional photographers do to their pictures, to make it look even better. So you do not have to feel ashamed for using a little help from example a program called Lightroom. I want to show you a before and after pictures to demonstrate what I mean. See the examples below, you need to click on the pictures to get a better comparison:

Before and after post production
The picture to the left was taken with the “shade” option, therefore it is more yellowish. In Lightroom you can easily adjust this to make it look more natural. It is more colorful on the picture to the right. The picture below shows a dark picture inside the forest. It is hard to get the right brightness when you take a picture. It is easy to fix in post-production.

Here is a final one that I like to share with you all. When you load a picture in the camera and watch it in the computer it can be colorless. With Lightroom you can bring out the bright colors and give the picture life again. There are many programs that can do this for your pictures for example Photoshop, Gimp (free program) and Topaz just to name a few.

I hope you have got some inspiration to work on your pictures now, it is worth it!
Do not forget to press the “follow” button to get yourself updated on more upcoming tips.
2014©Expressive photos

GorillaPod – a item you might need

If you need a tripod but do not want to carry a huge and heavy one. I have a solution for you. A JOBY GorillaPod. It is a small and flexible tripod that can grip on to anything. You can for example tie it around a tree branch or a chair. I bought one because I like to take things that might be on the ground or near the ground. Then this tripod is the perfect choice. There are many versions of this tripod. The one on the picture is for a DSLR camera with a big lens. Even though it might look small, it is strong and stable to put the camera or the lens on.
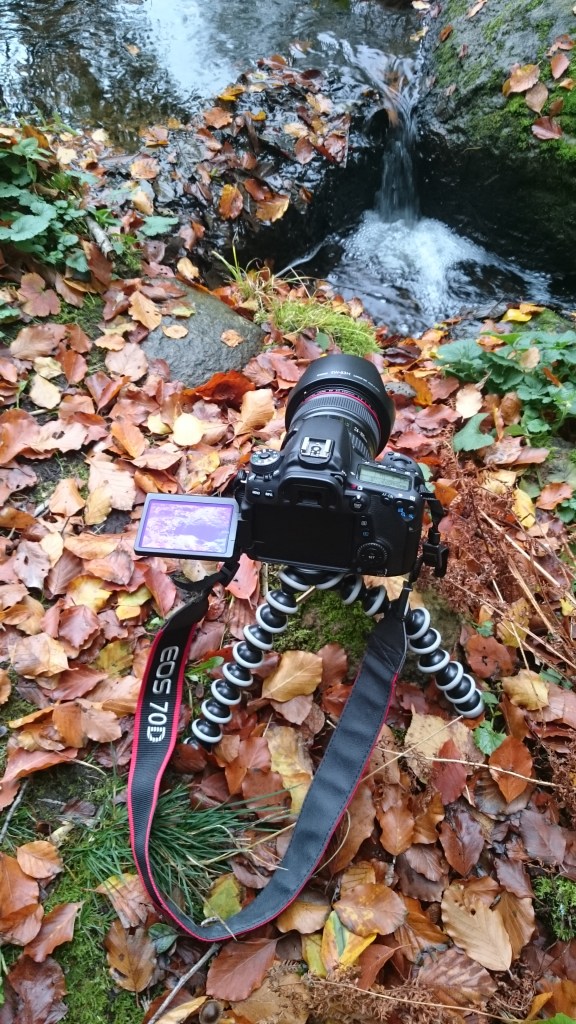
I used it to take long exposures of this small waterfall. It worked fine and the result can be seen below:
This tripod is also good for macro. If you see a insect on the ground or on a leaf then this will be helpful. I usually take those pictures without a tripod but after awhile you will get pain in your knees and in your hand/wrist. This tripod will take care of that problem. The best part is that it can fit in any camera bag. It weighs around 0.5 kg (11 pounds). It is 29 cm long (11.4 inch) and can hold up to 3 kg. It cost from 18$.
2014©Expressive photos

Autumn is here


I took a stroll in the forest since the color on the leaves are amazing this time of the year. I took some shoots with Canon 70D and Canon 24-105mm L lens.
To follow my blog and get more lovely updates click the “Follow” button.
2014©Expressive photos


